

Pricing your DIY products is all about covering costs and ensuring profit. Many sellers underprice by 15–30%, losing thousands in potential earnings. To avoid this, focus on these key steps:
- Account for all costs: Materials, labor, overhead, and platform fees must be included.
- Use proper formulas: A common method is
(Materials × 2) + Labor + Overhead = Wholesale Price, thenWholesale Price × 2 = Retail Price. - Understand fees: For example, Etsy fees average 15%, and Amazon FBA can range from 15–45%.
- Track your time: Labor is often undervalued – set an hourly rate that reflects your skill level.
- Market research matters: Study competitor prices but don’t blindly copy them.
- Adjust prices regularly: Review quarterly or when costs rise by 5% or more.
Proper pricing ensures every sale contributes to your bottom line. The goal? Profitability, not just high revenue.
HOW TO PRICE PRODUCTS TO MAKE A PROFIT | 5 Handmade Product Pricing MISTAKES To AVOID
sbb-itb-2a9374f
Understanding Cost Components
Knowing your product costs – materials, labor, and overhead – is essential to keeping your profits intact. Each of these categories plays a key role in determining a healthy profit margin.
Calculating Material Costs
Material costs include more than just the obvious supplies. You’ll need to account for raw materials like wood, fabric, or beads, as well as consumables such as glue or thread. Don’t forget packaging supplies – everything from boxes and tissue paper to tape and labels. Even small expenses can add up. For instance, a 50-cent label might seem minor, but across 500 units, that’s $250 out of pocket.
The best way to calculate material costs is to break them down per unit. Divide the bulk purchase price by the number of units it produces. For example, if a spool of wire costs $18 and makes 60 pairs of earrings, your cost per pair is $0.30. To this, add a 5–10% waste factor to cover spoilage or offcuts. For some materials, like tiles, you might need to increase this to 15%.
Many makers also use the "Materials × 2" rule, which doubles raw material costs to account for waste and potential price hikes between purchases. This is especially important given the volatility of commodity prices. For instance, in late 2025, beef prices rose 15%, and coffee jumped nearly 19% year-over-year. Having a buffer helps protect your margins.
Once you’ve nailed down material costs, it’s time to put a value on your labor.
Accounting for Labor Costs
Your time is money, and it’s often undervalued in DIY businesses. As fixnow.tools puts it:
"A business that does not compensate you for your time is a hobby that costs you money, not a livelihood." – fixnow.tools
Set an hourly rate that matches your skill level. For production work, rates typically range from $20–$30/hour, while specialized crafts like jewelry or leatherwork can command $30–$50/hour. When pricing your labor, track your time meticulously. Use a stopwatch to record every step of the process – setup, production, quality checks, cleanup, and packaging. Makers often underestimate their work time by as much as 30–50% if they skip these steps.
Here’s a quick breakdown of hourly rates by experience level:
| Experience Level | Examples | Rate Range |
|---|---|---|
| Entry-level | Learning the craft | $12–$18/hr |
| Competent | Efficient production | $20–$30/hr |
| Skilled Specialty | Jewelry, leather, glass | $30–$50/hr |
| Master-level | Fine art, signature designs | $50–$100+/hr |
Factoring in Overhead and Fees
Beyond materials and labor, you need to consider overhead and fees to ensure your business remains profitable. Overhead includes all the indirect costs of running your operation – things like rent, utilities, insurance, software, and equipment maintenance. To calculate per-unit overhead, divide your total annual expenses by the number of units you expect to sell in a year.
Selling platform fees are another factor. For example, Etsy’s fees – including transaction, payment processing, and listing fees – typically add up to about 15% of the sale price. To maintain your margin, don’t just multiply your price by 1.15; instead, divide your base price by 0.85.
"Every project consumes sandpaper, electricity, blade life, finishing materials, and shop time. A 0% overhead rate means your tools are free, your electricity is free, and your blades never dull." – Woodworking Pricing Calculator
Neglecting overhead costs can leave you scrambling to cover these hidden expenses.
Using Pricing Formulas
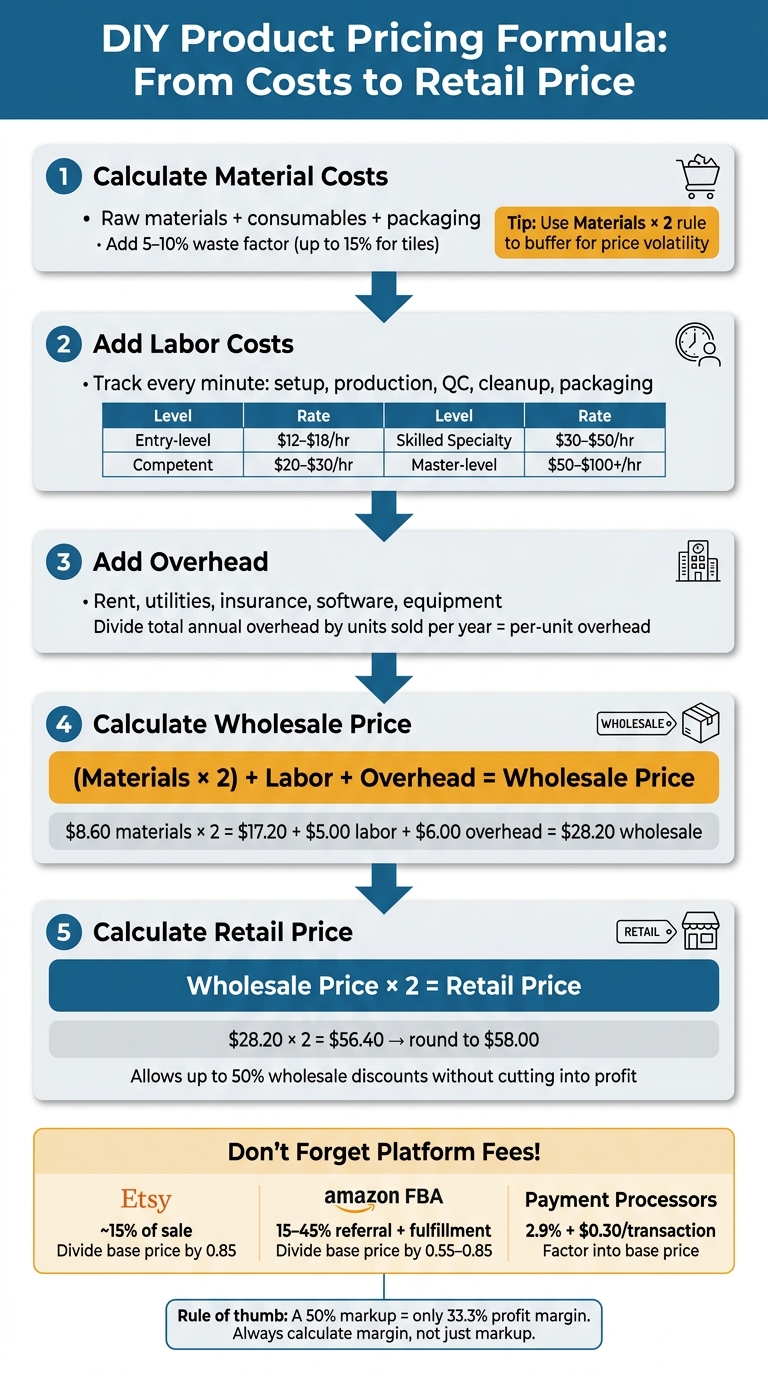
DIY Product Pricing Formula: From Costs to Retail Price
Once you’ve tallied up materials, labor, and overhead, it’s time to apply a pricing formula. This ensures you maintain the profit margins necessary to turn your DIY projects into a thriving business. Two common methods dominate the scene: markup and profit margin.
Markup vs. Profit Margin
Markup focuses on your cost, while profit margin is calculated from your selling price. As Sophie Reiter, Business Finance Editor, explains:
"The single most common pricing mistake in small business is not charging too little or too much – it is measuring the wrong thing and thinking you measured the right one."
Here’s a simple breakdown: if a product costs you $10 to make and you sell it for $20, that’s a 100% markup, but the profit margin is only 50%. The table below illustrates how markup and margin percentages align:
| Markup % | Resulting Margin % | Multiplier |
|---|---|---|
| 25% | 20.0% | 1.25x |
| 50% | 33.3% | 1.50x |
| 100% | 50.0% | 2.00x |
| 200% | 66.7% | 3.00x |
For DIY sellers, a practical formula that covers all cost components is: (Materials × 2) + Labor + Overhead = Wholesale Price, then Wholesale Price × 2 = Retail Price. Take, for example, a handmade candle with $8.60 in materials, $5.00 in labor, and $6.00 in overhead. The wholesale price would be $28.20, and the retail price would come to $56.40 – often rounded up to $58 for simplicity. This doubling approach allows you to offer wholesale discounts of up to 50% without cutting into your profits.
Mastering these pricing basics prepares you to account for additional costs.
Including Additional Costs
Don’t forget to factor in shipping, packaging, and platform fees. For instance, Etsy’s fees average about 10%, while Amazon’s referral fees range from 15% to 45% depending on the product category. To ensure your margins stay intact, adjust your base price accordingly. For a 10% fee, divide your base price by 0.90. Similarly, payment processors typically charge 2.9% + $0.30 per transaction.
Let’s look at a real-world example. In April 2026, product economics analyst Paul Vizzio examined a $45.00 dog leash. With a $13.40 landed cost, Shopify fees ($1.61), a $10.00 customer acquisition cost, and $11.00 in fixed business expenses, the per-unit profit came to $8.99. However, selling the same leash through Amazon FBA – with $6.75 in referral fees and $4.75 in fulfillment costs – resulted in a $0.90 per-unit loss. The pricing formula stayed the same; it was the additional fees that shifted the outcome.
Treat fees and packaging materials – like boxes, tissue paper, and inserts – as part of your costs, not just deductions. These seemingly small expenses can add up quickly as your volume grows. With these pricing strategies in place, you’re ready to compare your prices against the market for further refinement.
Researching Market Prices
Conducting Market Research
Understanding your costs is only part of the puzzle. The other key piece? Knowing what customers are willing to pay and how your competitors are pricing their products.
Start by analyzing at least 15 niche products to identify the market median price. Platforms like Etsy, Amazon, and independent Shopify stores offer a broad perspective. If a product’s price falls far outside the typical range, there should be a clear justification for it.
Don’t just focus on listed prices – dig deeper. Look at competitors’ shipping fees, refund policies, and packaging quality. For example, a seller offering a product at $32 with free shipping might undercut another seller charging $28 plus $6 for shipping. Laura Thompson, co-founder of Three Ships Beauty, shared her experience:
"We were actually priced, I think, too cheap initially that people didn’t associate the product as being high quality."
Setting prices too low can hurt your product’s perceived value, especially for handmade or artisan goods. In these markets, a gross margin of 50–70% is common and often sustainable. Competitor prices should guide your strategy – not dictate it.
Once you’ve gathered your market data, use a pricing comparison table to refine your approach.
Using a Pricing Comparison Table
A pricing comparison table helps you organize market data and fine-tune your pricing strategy.
For instance, sellers often price products 15–25% higher on Shopify than on Etsy. Why? Shopify buyers tend to compare fewer alternatives. Here’s an example of how you might structure such a table:
| Dimension | Etsy Listing | Shopify Store | Amazon FBA |
|---|---|---|---|
| Unit Cost (Materials + Labor + Overhead) | $18.60 | $18.60 | $18.60 |
| Platform Fees | ~10% | ~2–3% | 15–45% + fulfillment |
| Competitor Reference Price | $38–$48 | $45–$55 | $35–$42 |
| Target Margin (50%) | $37.20 | $37.20 | $37.20 |
| Recommended Sell Price | $42.00 | $48.00 | $39.99 |
| Price Index (Your Price ÷ Market Average) | 95 | 102 | 97 |
The Price Index column is particularly insightful. A score below 100 suggests you’re positioned as a value option, while a score above 100 indicates a premium offering. Either can work, but it’s essential to choose your position intentionally. Sara Panton, co-founder of Vitruvi, emphasized this point:
"Pricing and bundling is also an important part of Vitruvi’s strategy. I probably talk about margin, like, twice a week with our executive team, because it’s really a moving target."
Revisit and update this table every quarter. Fluctuations in material costs, competitor pricing, and platform fees can quietly eat into your margins if you’re not keeping an eye on them .
Wholesale and Retail Pricing Strategies
Wholesale vs. Retail Pricing: Key Differences
Once you’ve completed your cost analysis and market research, it’s time to decide which sales channel – direct-to-consumer (DTC) or wholesale – best matches your business objectives. Each channel has its own pricing structure, and confusing the two can quickly eat into your profit margins.
Retail pricing through DTC allows you to control pricing and keep the full profit margin from each sale. On the other hand, wholesale pricing involves selling in bulk at a discounted rate. While this means lower profit per unit, it offers the advantage of higher sales volume and steady, predictable orders without the need for heavy marketing efforts. In short: retail prioritizes per-unit profit, while wholesale focuses on volume and consistency.
A common pricing model in the industry is the "2x/2x" rule, also known as keystone pricing. This approach suggests setting your wholesale price at approximately 2× your cost of goods sold (COGS) and your retail price at 2× your wholesale price.
However, many small-scale sellers underestimate the hidden costs of wholesale, such as promotional allowances, chargebacks, and slotting fees. For example, retailers often demand promotional allowances, which typically range from 5–15% of wholesale revenue. Additionally, compliance errors can lead to chargebacks, costing new vendors 1–5% of revenue in their first year. Slotting fees, which grocery chains charge just to carry your product, can range from $5,000 to over $25,000 per SKU per retail chain. As RetailerHub aptly warns:
"A retail placement that loses money doesn’t become profitable at higher volume – it just loses money faster."
To avoid these pitfalls, calculate a floor price – the minimum wholesale price that covers all costs while leaving room for a sustainable margin – and stick to it. If you plan to sell DTC alongside wholesale, implement a Minimum Advertised Price (MAP) policy to prevent your retail partners from undercutting your prices and causing channel conflicts.
The following table offers a clear breakdown of how wholesale and retail pricing strategies play out for a product with an $8.00 COGS and a $29.99 MSRP.
Wholesale and Retail Pricing Comparison Table
| Line Item | DTC (Online) | Wholesale (Retail) |
|---|---|---|
| Selling Price | $29.99 | $14.99 |
| COGS | −$8.00 | −$8.00 |
| Promotional Allowance | $0.00 | −$1.50 (10%) |
| Freight | −$4.50 (DTC shipping) | −$0.75 (bulk freight) |
| Chargebacks / Fees | $0.00 | −$0.30 (2%) |
| Net Profit per Unit | $21.99 | $3.84 |
| Effective Margin | 73% | 26% |
This table highlights the stark difference in profit margins. While wholesale’s 26% margin might seem low, it offers stability, scalability, and the benefit of not having to acquire customers one by one. However, this model only works if your COGS is low enough to handle the associated deductions. If your margins are already slim, wholesale can quietly drain your profitability.
To protect your profit margins while scaling, consider creating retail-exclusive SKUs. These could include unique sizes, bundles, or configurations that are only available through retail partners. This strategy not only prevents direct price comparisons but also ensures your DTC pricing remains unaffected.
Adjusting Prices Over Time
When to Review Your Prices
Pricing isn’t static – it needs to adapt to changes in costs, competition, and demand. Sara Panton captures this well when discussing the fluid nature of margins:
"I probably talk about margin, like, twice a week with our executive team, because it’s really a moving target – and I think if it isn’t a moving target for you, then you’re not looking at it close enough."
For most businesses, reviewing prices quarterly is a good rule of thumb. However, if you’re dealing with volatile materials like lumber or copper – where prices can swing 15–20% in a single month – you might need to review pricing monthly or even bi-weekly. A helpful benchmark: if your cost of goods sold (COGS) has risen more than 5% since your last pricing update, it’s time to reassess.
In addition to raw material costs, keep an eye out for these indicators that a price review might be overdue:
| Trigger Type | Specific Signal | Recommended Action |
|---|---|---|
| Cost | COGS increase > 5% | Recalculate target price using current costs |
| Competition | Competitor enters or exits the market | Reevaluate your value proposition; avoid underpricing |
| Demand | Booked out 2+ weeks | Test a 10–15% peak-season premium |
| Performance | Margins fall below industry standards | Audit operations and raise prices if necessary |
| Skills | New certifications or specialized techniques | Adjust rates to reflect added expertise |
These triggers go beyond basic cost analysis, offering practical cues for when to revisit your pricing strategy.
It’s also important to consider timing. For instance, while fuel costs might rise immediately, the ripple effects on manufactured goods, chemicals, and plastics often take 3–6 months to show up. If you base your pricing solely on current costs, you risk being underpriced by the following quarter.
How to Adjust Prices Without Losing Customers
Once you’ve identified the need for a price adjustment, the next challenge is implementing it without alienating your customers. The key is to act thoughtfully – neither delaying too long nor making abrupt changes.
Start small. Instead of overhauling your entire pricing structure, test a 5–10% increase on a select group of products or services. Monitor how sales volumes react. This approach mirrors cost-based pricing principles. For example, during the 2018–2019 tariff hikes, a retailer initially faced backlash after applying broad price increases under 5%. By switching to targeted adjustments on high-margin items, they managed to boost margins by 9% while also growing sales by 5%.
Another strategy to keep in mind is left-digit anchoring. Even a small jump, like moving from $9.99 to $10.05, can feel significant to customers. Whenever possible, stay just under the next round-number threshold. These subtle pricing strategies can help maintain profitability without triggering negative reactions.
Transparency is critical. Notify customers at least 30 days in advance and clearly explain the reasons for the change – whether it’s due to rising material costs or supply chain challenges. A simple message like this can help maintain trust:
"Ingredient costs have increased and I’ve updated my prices to reflect that. Thank you for your continued support." – Craftybase
If customers push back, resist the urge to offer discounts that could eat into your margins. Instead, consider scaling back the scope of work – for example, using standard-grade materials or removing optional features. Keep in mind that even a 1% discount requires about a 3% increase in sales volume to maintain the same profit level.
Conclusion and Key Takeaways
Pricing your DIY products accurately is critical for maintaining profitability. To achieve this, your final price must account for all costs – raw materials, labor, packaging, overhead, marketplace fees, and even equipment depreciation. If these costs aren’t covered by your customers, they fall squarely on you.
While many handmade businesses target a gross margin of 40–60%, research shows that 80–90% of products are underpriced. This highlights a common challenge for small business owners. As Ivana Taylor of DIYMarketers explains:
"A price that’s too low doesn’t communicate value – it communicates risk."
It’s also worth noting that a 50% markup only translates to a 33.3% profit margin. This demonstrates how crucial it is to calculate prices with precision, ensuring every sale fully covers costs and supports sustainable growth.
FAQs
How do I set my hourly labor rate?
To figure out your hourly labor rate, start by adding together your total annual overhead and the income you aim to earn. Then, divide that sum by the number of billable hours you can realistically work in a year. Don’t forget to account for time spent on non-billable tasks like admin work or travel. Once you have this base rate, tack on a profit margin – typically around 20–30%.
Here’s a quick breakdown:
- Minimum Rate = (Overhead + Desired Income) / Billable Hours
- Final Rate = Minimum Rate × (1 + Profit Margin)
For smaller jobs, it’s a good idea to include an extra service fee to ensure your time is fully covered.
How do I price items with free shipping?
When providing free shipping, make sure to include all shipping-related costs – like postage and packaging – into your total cost of goods sold (COGS). To stay profitable, adjust your retail price to cover these expenses, along with any marketplace transaction fees, which are often based on the total sale price. Strive for a net profit margin of 40–60% to ensure you’re covering shipping costs while still maintaining a healthy bottom line.
When should I raise my prices?
If your production costs – such as materials or labor – have gone up and your profit margins have dropped below 30-40%, it might be time to consider raising prices. Other clues? A surge in order volume without a corresponding profit increase, not having reviewed your pricing in over a year, introducing new capabilities, or realizing competitors charge more for similar services. Always rely on hard data to guide your decision, rather than just a sense that your work is undervalued.
